Sunday, July 31, 2011

Little Doll I Made

 
Posted by Picasa

Just wanted to share this little doll I made for one of my granddaughters. Two done, two to go!!! Now to find something for the boys and the two teenage girls! Thanks for visiting, I would love for you to follow or leave a comment. Both are greatly appreciated!!!

Pretty Pink roses Card

Just wanted to let you see this very fast cute card and envelope I made from my scraps stash! Simple can be beautiful! Hope everyone is having a wonderful weekend and keep on crafting!

 
Posted by Picasa

Monday, July 25, 2011

My Littlest Helper

Thought I would show a photo of my youngest helper that I took about 7 months ago. She has grown tremendously since then. She is now two and a half years old. My, oh, my, somedays she is really going through those terrible twos!! Some days, she is the sweetest angel! But every day, she is very much loved.

 
Posted by Picasa

Little Girl Birthday Card

A little birthday card I made for one of my granddaughters. The papers and cardstock were all from my scraps stash. The little frame is one I picked up at Dollar Tree one day. And I am not sure where the embellies are from - just found them in my stash, as well as the small ribbon and so this little card came into being. I used a current photo that I had taken of her, printed it out and cut out her face. Took a rectangle of co-ordinating paper folded in half for a tag and placed a sticker on the front of it. Turned out pretty cute and she really loved it!

 
Posted by Picasa

Friday, July 22, 2011

Substitute The Sentiment for A Great Masculine Card

I made this card for Father's Day but didn't get it posted so I thought I would share it as a masculine card and you can substitute any sentiment you would like.


Posted by Picasa

Stamped the images from Stampin' Up's Forest Friends stamp set onto white cardstock. Inked up the tree with desired color, then stamped darkest tree, stamp again for lighter trees; this makes them seem farther away which gives a sense of depth. For the animals, I stamped them on white cardstock, also and fussy cut around them. Popped them up with pop dots in the desired positions after I took a cat eye ink pad in green turned side ways and applied to cardstock under the stamped trees to simulate tall orchard grass. Used the chocolate chip felt ribbon (now discontinued) and sheer brown ribbon from Walmart. Wright's ribbon, I believe. You can use these techniques with many different stamps to create a montage or scene for your cards. For the greeting, I made my own sentiment using alphabet stamps placed on a clear block, then inked and stamped on white cardstock, fussy cut and glued to colored cardstock and cut out leaving a margin around words to create a background which emphasized the sentiment!

Cloud designer paper and the grid design paper is from a now discontinued Stampin' Up paper pad, "Welcome Neighbor". (I frequently purchase older paper lines being discontinued or dropped for a fraction of the original price to use for my cards and scrapbooking, etc. It is an excellent way to save money and have a bigger selection of papers, stamps, etc.) Also many times I purchase the smaller sizes of paper, IE, this was a 6"x6" paper pad, to save even more money for my crafting budget.

Please feel free to ask any questions. Join to be a follower. Please know that I value each and every comment and everyone that takes the time to visit my blog. You always make my day brighter! Thank you.

Happy card making!

Wednesday, July 20, 2011

Inside the Tree Card

 
Posted by Picasa
Wanted to show the inside of this card. I used an image printed off the computer, a circular sentiment cut from a vellum quote sheet from Paper Wishes, then add your own little touches for a fast and easy card.

My Little Frog

Thought I would share a photo of my littlest angel (who is 2 1/2 now) wearing her little frog cap I crocheted for her! Worth a chuckle or two; at least a good smile. Thanks for visiting. Your comments are much welcomed.
 
Posted by Picasa

Tree Birthday Card

A very simple card using cut out images and sentiments printed on vellum to cut and glue on to a simple white card base to make a very quick card to send.


Posted by Picasa

Hope you like it. Remember to click on photo to see a larger image.

Blue and Brown Butterfly Card

Another butterfly card made from DCWV Blossoms and Butterflies mat stack. (My frugal tip for the day: You can get a lot of mileage out of a mat stack, which is 4 1/2" x 6 1/2", it costs much less than larger paper packs but is just the right size for most cards we make. Also use a 40% off coupon at your favorite paper store to get it for even less. I wait for Joann.com to have a 40% off sale and order several packs of papers, etc. Watch for their free shipping coupons that frequently appear and save even more)
If you like the look, you can piece two different papers together to use on your card, so many of the papers co-ordinate. You can use mat stacks to scrap with a lot of times for smaller pieces of paper needed and to cut accessory pieces from. Try a mat stack for your next purchase and see how much mileage you get from it. Thanks and I hope you enjoy the card for today.
 
Posted by Picasa

On this card I used two different papers from the DCWV Blossoms and Butterflies mat stack. Glued them to the base card, cut out butterflies and glued them in place, attached an epoxy word to the fromt top, a small piece of ribbon at the bottom fastened down with small brads, and was finished with the front. Opened the card and used scraps glued inside to frame a sentiment quote I printed off and glued to the right hand inside.(not shown) Card is finished and ready to sign and send. Happy Crafting!!!

Sunday, July 17, 2011

Birthday Card

Here is a birthday card I made; along with an envelope. Usually I make all my envelopes. If not in too big a rush and don't feel like poop; I embellish the envelope to co-ordinate with the card. Thanks for taking time to visit today. I am just learning to blog so please be patient. I'll get there.

 
Posted by Picasa
On this card I used DCWV Blossoms and Butterflies Mat Stack that I purchased at Joann's at 40% off during one of their sales online. (Most of my supplies are purchased online simply because being disabled it is too hard for me to get to a craft and hobby shop since the closest is 90 miles away!) The butterflies were punched using a Martha Stewart punch and then outlined on all edges with a Sharpie extra fine point marker and scribbled and filled in with Crayola Spider Writers I had purchased for my grandchildren - yes, I borrow from them sometimes. LOL
Folded the wings up a little, swiped the underside of them in DI Milled Lavender and set aside. The circles I cut with Nestabilities, one out of white cardstock, one out of a scrap of lavender cardstock. The lavender circle I cut larger and then cut around the circle carefully with some decorative scissors. On the white cardstock, I stamped the birthday cake from Stampin' Up Whimsical Words collection and the sentiment. The Happy Birthday stamp I used who knows where it is from, it is very old one, I have had for ages!
Took a pale yellow 8 1/2 x 11 cardstock card(?), scoring it on my Martha Steward scoreboard and then cutting on the scoreline with on the Fiskars rotary cutting board. Then scored halfway of that and folded over on the crease forming my card. On the front I glued the designer papers and circles, then made a slit in the crease of the card where I wanted the ribbon (scrapbag) to come thru, threaded the ribbon and tied in a simple bow. Placed the butterflies on card where I thought they looked the best and glued them on. Printed a verse out on the computer that I like on regular copy paper, tore edges (not shown), inked them with the Milled Lavender and stick glued it on the inside. It is a simple card but I thought it turned out quite nice. Remember to click on photo to see a much larger image.

Please leave a comment, I read all of them and they are sweet words to me and much appreciated, so thanks for all the good thoughts and comments.

Friday, July 15, 2011

Tim Holtz's New Distress Stains

Wow, we have all been talking about these. Gotta get me some, gotta get me some!!!

NEW!! Tim Holtz Distress Stains Colors

You've been begging for these ever since we released the first twelve colors of Distress Stains. Well beg no more, because they are here at last! Say hello to the remaining twenty-five colors of Tim Holtz Distress Stains!

"Twenty-five?" you ask. "But there were only twenty-four Distress Ink colors left to match in the Stains palette!"


'Tis true. But we are proud to introduce a special formulation of Distress Stain in Picket Fence, an opaque white!


Like all Distress Stains, Picket Fence is a fluid stain for papers and porous surfaces that can be used for quick and easy coverage of backgrounds and large areas. But Picket Fence is opaque so it can be used as a base coat for the other Distress Stains, creating pastel hues in your projects. You can also use Picket Fence on the Inkssentials Non-Stick Craft Sheet in conjunction with other Stains colors to achieve unique marbleized effects! It is perfect for swiping over dark papers and cardstocks, too. You're going to love it!

For more information, check out the official press release or visit us at CHA Summer, booth #731. Ranger Ink.

More New Ranger Products

Wow, check out these new surfaces for us to play on: Fantastic!!!

NEW!! Inkssentials Surfaces!


Also debuting at CHA Summer 2011: Black and Kraft surfaces in #5 and #8 craft tags as well as ATCs are joining the Inkssentials Surfaces line! Black and Kraft surfaces have smooth finishes and are perfect for stamping, inking, embossing, decorating, embellishing and altering! The black surfaces have a solid black core while the kraft ones have a solid brown kraft core. They accept all types of mediums and the heavy-weight cardstock will stand up to your favorite wet and dry techniques.

Remember those new Perfect Pearls Mists colors we announced last week? And the Snow Cap Adirondack Mixative? And the new opaque white Picket Fence Distress Stain? How perfect would these be when paired with our black Inkssentials Surfaces tags and ATCs?! Just imagine the creative possibilities! Perfect Pearls Powders and Adirondack Metallic Mixatives would be amazingly beautiful on these black surfaces too!

The kraft tags and ATCs would be absolutely wonderful paired with Distress products and techniques since they naturally have that aged, antiquey look. Try using them as gift tags, as accents on your scrapbook pages and incorporated into your mixed media projects!

For more information about the new black and kraft Inkssentials Surfaces, check out the official press release or visit us at CHA Summer, booth #731.

Ranger's New Products!!!

Stopped by Ranger Ink's blog and what wonderful products they have in store for us. I am putting some here on the blog for you to see. Magnificent aren't they???

July 15, 2011
NEW!! Melt Art

Last but certainly not least in our previews of our CHA Summer 2011 product debuts:


We've completely updated and refined the Melt Art product line! Melt Art now has an edgy, bold new look to appeal to a wide variety of crafters. By melting Melt Art UTEE (Ultra Thick Embossing Enamel) or BeesWax in the Ranger Melting Pot, you can create three-dimensional stamped projects, unique jewelry, home decor pieces, mixed media artwork and so much more!

The line consists of:

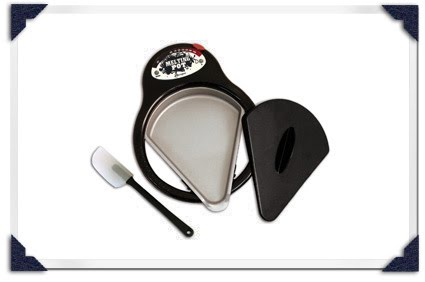
• The Ranger Melting Pot. So incredibly versatile, it can melt UTEE, embossing powders, BeesWax, soap, hot glue, and other meltable mediums. It can even bake polymer clay! A non-stick spatula is now included with the Melting Pot as well.


• UTEE (Ultra Thick Embossing Enamel). Once these large particle embossing enamels are melted in the Melting Pot, you can dip Shrink Plastic, chipboard, wire, glass and more into it to create amazing embellishments! UTEE comes in Clear (1 lb, 8 oz, and 4 oz jars, by volume) and 3 oz jars of White, Black, Platinum, Bronze and Gold (meant to be melted into a Clear base to colorize it). You can also pour melted UTEE directly onto your Non-Stick Craft Sheet to stamp into, or pour it into....

• Mold-N-Pour! By kneading together equal amounts of each of these two putties and then pressing pretty much any object you desire into it, you will create a custom, permanent, flexible, re-usable mold of said object! The possibilities are truly endless with Mold-N-Pour, and each package contains enough putty to make several different molds.

• Melting Pot Project Pan. The Project Pan perfectly fits into your Melting Pot and allows for low-temperature melting of things like....

• Melt Art BeesWax! Available in both Clear and Natural, these beeswax pellets can be melted down and then brushed onto mixed media artwork. You can also color them with...

• Melt Art Heat It Inks! These heat-safe inks are used to color BeesWax as well as Clear and White UTEE. These are brand-new to the Melt Art line and are available in two sets: Brilliant Gems (Garnet, Citrine, and Sapphire; a basic primary kit) and Organic Gems (Jade, Coral and Turquoise). Use these colors to create amazing jewelry: when used in a White UTEE base they will make opaque faux gemstones and when used in a Clear UTEE base the faux gems will be translucent!

So what do you think?? Are you excited to start Melting, Dipping and Pouring with Ranger Melt Art?

To learn more about the Melt Art redesign and the brand-new Heat It Inks, check out the offical press release or visit Ranger at CHA Summer 2011, booth # 731.

Thursday, July 14, 2011

Something Special Celebration Giveeaway

Please visit over at the Something Special blog for some great projects and ideas. She also is having a "Something Special Celebration Giveaway" over there posted June 30, 2011. So go ahead click Here and go visit Michele for an opportunity to win some beautiful eye candy for you home, studio and yourself.


So run on over and check her blog out. I am sure you will agree, it is wonderful!

Copic and other items giveaway!!!

Be sure and go to visit "She Stamps". It is a fantastic blog and she is also having a great giveaway with several ways to enter so you can enter for the prizes more than once. Just click on "She Stamps" and it will take you to her site. I tried to post the photos of her candy here but couldn't get blogger to accept them. Great giveaway, huh? Please leave me a comment, they make my day!!!

To Die For Giveaway

You must click to visit this blog. They have one of the most gorgeous handmade giveaways, I have ever seen. Daphne Nicole - LyndaCade.blogspot.com.


Did you check it out??? Wonderful isn't it???

Since I haven't been able to develop my tutorials yet, Betina is still not doing well, I have been listing giveaways. I hope you have been enjoying them.
Have a wonderful evening. If you come by, please leave me a comment. They are so much appreciated, especially in a stressful time like now.

Wednesday, July 13, 2011

Memory Makers Magazine New Store

Memory Makers just opened a new store online and to celebrate are giving away two copies of the new book on using scrapbook sketches. Get all the info here: Memory Makers

Readers, my daughter, Betina, is still very,very sick but I thought posting the contest would give my blog a good post with less time and thought from me which I have so little of right now. Thank you for your continued patience.

Sorry I copied this extremely long URL and now it doesn't work. Just go to Memory Makers magazine.com/blog and look for the post on opening the new online store. Thanks. I changed URL, you can try it first, thank you.

Monday, July 11, 2011

Prima At CHA

Please check out their facebook page to enter for a chance to win some Prima product!!!
Prima Marketing Flowers
The CHA prizes just keep coming!! Want to win? Here's what you do:

1. Click on the photo in the facebook comment on Prima's home page.
2. Click on the "Share" link and share it with your friends.

3. Enter a comment under the photo letting us know that you have shared.


We will choose a random winner from all of the comments made. Open to all. One comment per person only please. Winner will be announced here on Facebook tomorrow. Be sure to tell all of your friends to "like" us and enter themselves! Good luck!

Just a few delightful products you might win ? or purchase.


Wow, beautiful! Right? Well get busy checking it out on Prima's facebook. Good luck to all who enter.

Sunday, July 10, 2011

Best Creation Inc.: New CHA Collections Reveal Day 2!

Best Creation Inc.: New CHA Collections Reveal Day 2!: "It's day 2 of our reveals and Mom's Kitchen is next! This collection will remind you of the good ol' days in the kitchen with Mom or Grandma..."

Wow, Glitz' New Collections

Introducing "Beautiful Dreamer"
Welcome to our last day of introductions into our three new collections coming out during Summer CHA! We are loving your response so far, and are so excited that YOU love our latest collections! Before we get going on the final one, don't forget that all of these giveaway posts are open for comments until July 20th!! Here are links to the first two giveaways:

Dance in Sunshine

Vintage Blue

Just be sure to follow the commenting instructions listed at the bottom of each post!

Well, today we have the Beautiful Dreamer collection to share with you...which is probably my favorite of the three because it is my VERY favorite colors all together. Sigh...so dreamy, just like the name! :) Without further ado, here is Beautiful Dreamer!


Isn't this line just GORGEOUS!! Totally loving everything about it!!

We are giving you two entry options to win, so please read carefully:
1. Leave a comment on this post, telling us what you love most about "Beautiful Dreamer"!!
2. Create a blog post on your own blog about this new collection and this giveaway. Once you have done so, come back here and post the DIRECT LINK in a second comment on this same post. {If you do not have a blog, you may go to your favorite online forum and post it on the correct board. We would prefer it to be on your blog though, so if you have a personal blog....please make sure you post it there!}

The comments will stay open until 11:59pm PST on July 20th, and we will post the winners on the last day of CHA....July 21st at 12:00pm PST!